

When you’re just getting started with your business, there are so many details to figure out. Client billing is just one of them.
There’s an easy way to create invoices and get paid on time, staying on top of bookkeeping duties and everything else related to your finances.
The trick is simple: rely on automation as much as possible and modern billing tools can help you establish a smooth billing process.
In this article, we’ll look at the ins and outs of client billing and show you how to build an efficient system.
What is Client Billing?
Client billing is the process of charging your clients for the services or products you’ve delivered. It typically involves creating and sending invoices that outline the agreed-upon fees, payment terms, and deadlines.
However, late payments are the biggest challenge in billing.
That’s why your client billing process needs to be designed to discourage late payments. For example: automation and on-time reminders reduce late payments by 5 days.
Key Components of Client Billing
Now that you know what client billing is, let’s take a look at all the components that are part of the process:
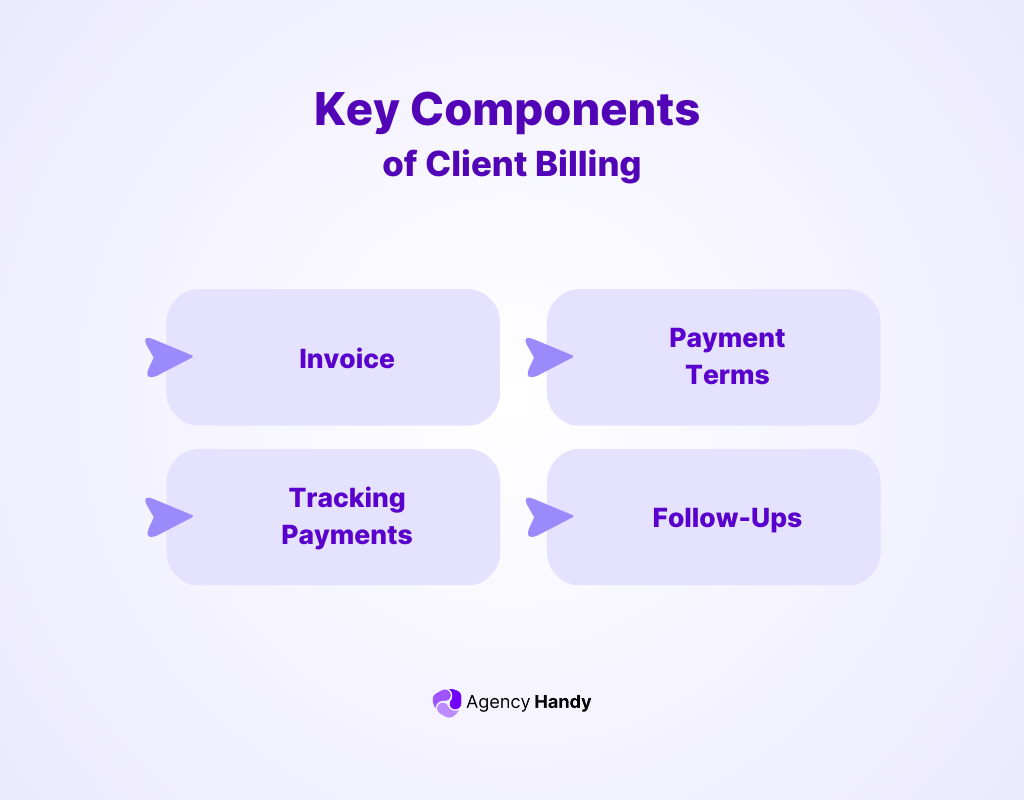
1. Payment Terms
Client billing starts with solid payment terms. It will help you and your clients stay on the same page. It protects you in payment disputes, which isn’t an uncommon occurrence.
Versapay reports nearly $1 million of tied-up funds every month for mid- to upper-mid-sized companies due to payment disputes.
So, always let your clients know exactly when they need to pay, how they can pay, and what happens if they’re late.
It includes setting deadlines, listing accepted payment methods like credit cards or bank transfers, and explaining any late fees.
Get their e-signature to ensure they agree to the terms and make the contract binding.
2. Invoice
A client invoice is probably what enters your mind first when talking about client billing. But what details are included in an invoice?
A professional invoice should include:
- Business and client information
- Service descriptions and rates
- Payment deadlines and terms
- Tax and additional charges, if applicable.
3. Tracking Payments
Keeping track of invoices and payments is key to staying on top of your finances. It helps you avoid late payments and keeps your cash flow steady. Plus, it strengthens your relationships with clients when everything runs smoothly.
Did you know small businesses spend around 14 hours each week chasing overdue payments? That’s a lot of time you could use to grow your business instead.
With the right invoicing software for small businesses, you can easily monitor payments, save time, and reduce the stress of collecting overdue amounts. It’s a simple way to keep things organized and stay focused on what matters most.
4. Follow-Ups
Sending timely reminders for overdue payments or upcoming deadlines will keep everything on track. A polite follow-up can often be the difference between getting paid on time and facing unnecessary delays.
Instead of manually chasing payments, you can automate reminders with tools like Agency Handy. It saves you time and ensures your clients get gentle nudges without the extra effort.
What’s the Right Client Billing Method for Your Business?
The pricing model is an important part of your business strategy. By choosing one that matches the nature of your service, both you and your clients get a fair deal. Here are the models to consider.
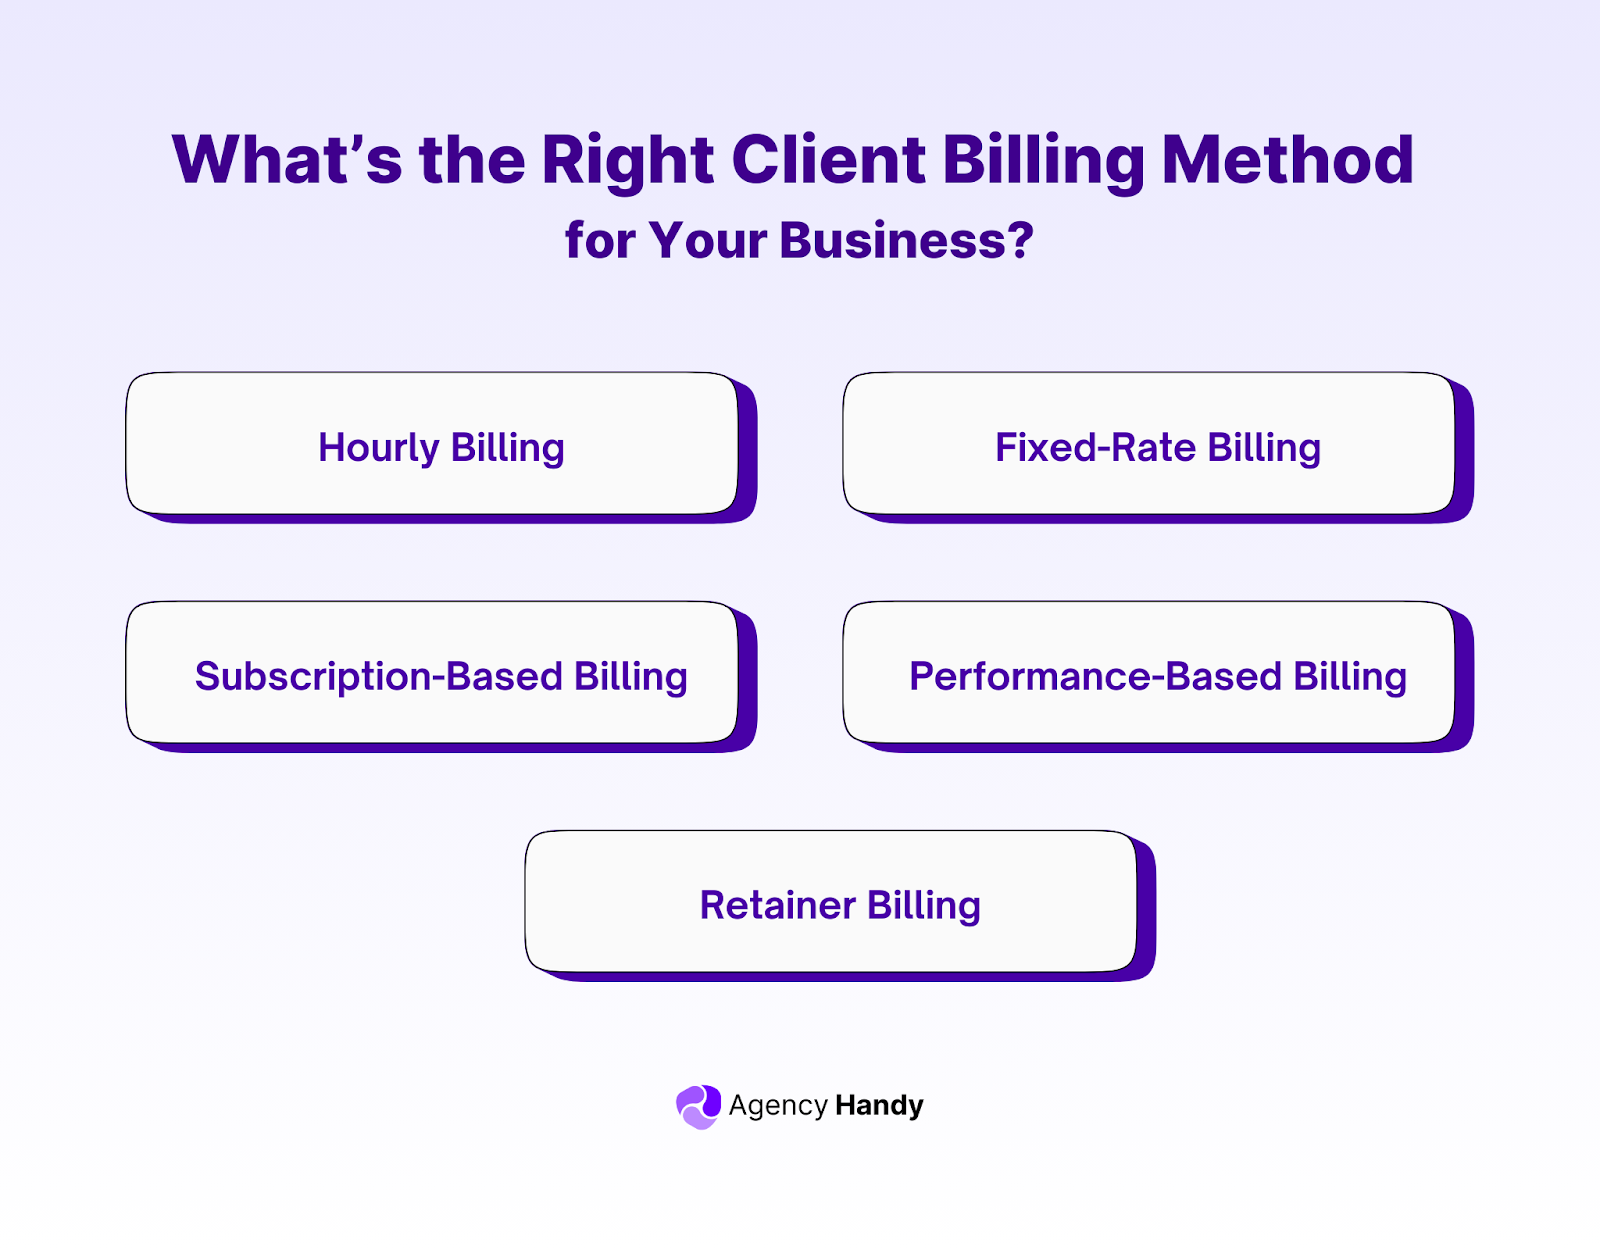
1. Hourly Billing
Hourly billing is simple: You charge clients based on the number of hours you work, track your time, and bill them for the total hours spent on their project.
Best for: Projects with changing scopes, flexible tasks, or occasional work needs, such as website debugging, freelance writing, or consulting sessions.
2. Fixed-Rate Billing
Fixed-rate billing means you charge a set fee for the entire project or service, no matter how much time it takes to finish. Clients like this approach because it gives them clarity. They know exactly what they’ll pay upfront.
Best for: Defined, one-time projects with predictable outcomes, such as logo design, website development, etc.
3. Subscription-Based Billing
Subscription-based billing means charging clients a recurring fee, weekly, monthly, or annually, for continuous access to your services. It’s a simple and predictable way to structure payments, making it easy for both you and your clients to plan ahead.
Best for: Services with consistent deliverables needed on a recurring basis, such as monthly content creation, bookkeeping, website maintenance, etc.
4. Performance-Based Billing
Performance-based billing ties payment to specific results or performance goals. You only get paid when you achieve agreed-upon outcomes, like driving sales, generating leads, or boosting website traffic.
Best for: Outcome-focused services like lead generation, sales, or ad campaigns.
5. Retainer Billing
Retainer billing is a payment model where clients pay a recurring fee for ongoing access to your services.
This fee ensures that you’re available for a specified amount of work or set scope during that time period. It can cover a fixed number of hours, specific tasks, or deliverables agreed upon in advance.
Best for: Ongoing projects requiring regular work, such as legal services, IT support, SEO, or financial consulting.
How to Bill a Client: Step-by-Step Guide
Now, let’s get to the process of billing your clients. Follow the steps below:
- Set payment terms
- Create and send an invoice
- Connect to payment gateways
- Set up automated reminders
Okay, now let’s break down each step.
1. Set Payment Terms
To avoid disputes and delays, it’s important to set and agree on payment terms with your clients clearly. One way to do this is to create a simple PDF, email it to your clients, and ask them to return it with an e-signature.
A better way is to use client management software, like Agency Handy, to handle the process more efficiently. With its tools, you can send proposals, clearly outline payment terms, and share everything through a client portal.
And the platform includes a built-in e-signature feature, so your clients can review and approve the terms quickly and easily.
2. Connect Payment Gateways
Now, before moving to invoices or getting paid, make sure you have the right payment gateway. You can integrate Stripe, PayPal, Wise, and manual banking.
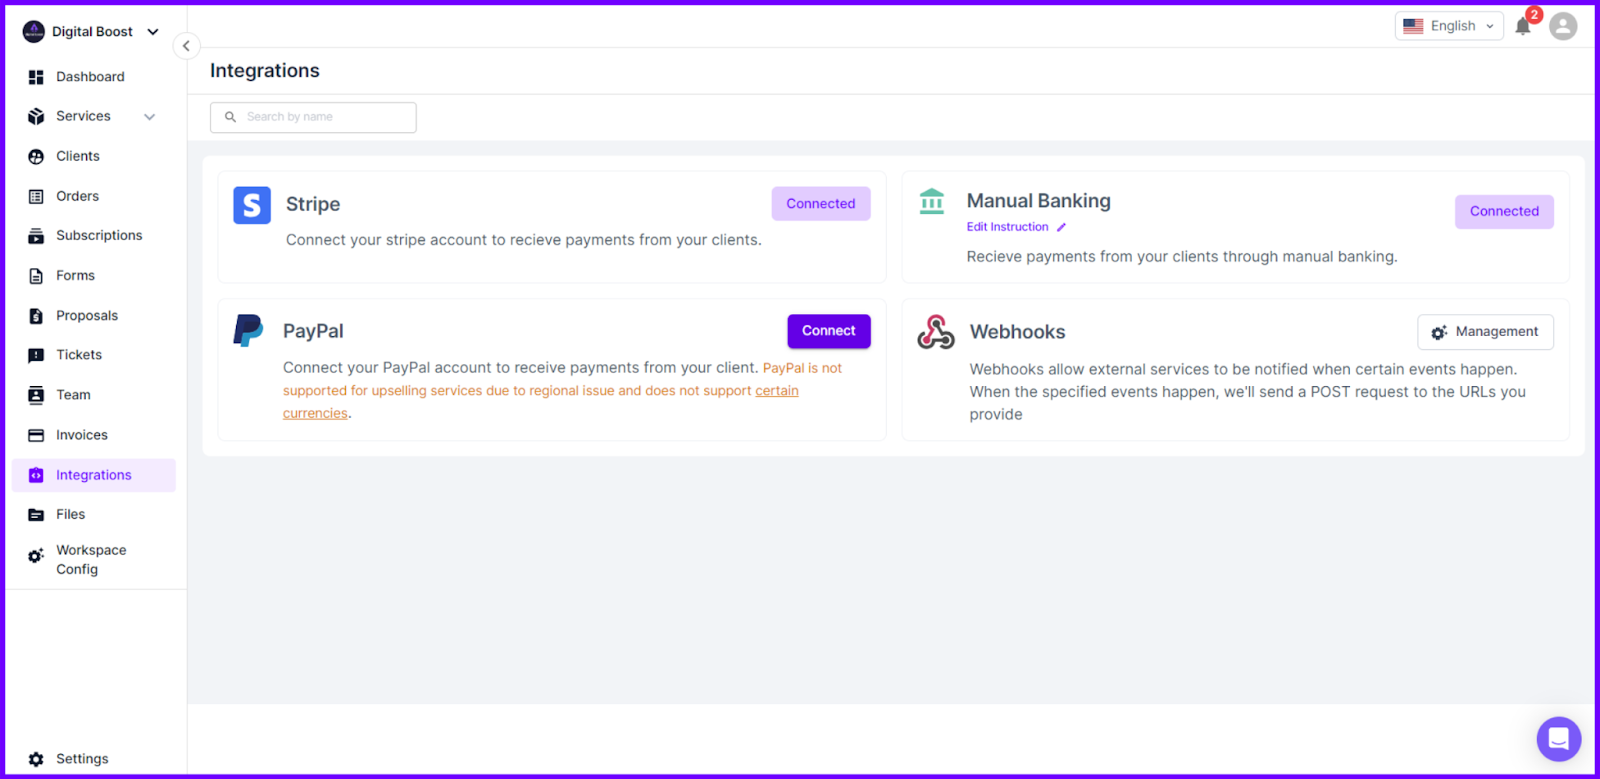
You can easily set this up by looking at the Integrations section from the sidebar. From there:
- Select the payment gateway you wish to connect.
- You can directly connect Stripe, PayPal, or bank accounts.
- Save your settings to activate the payment option.
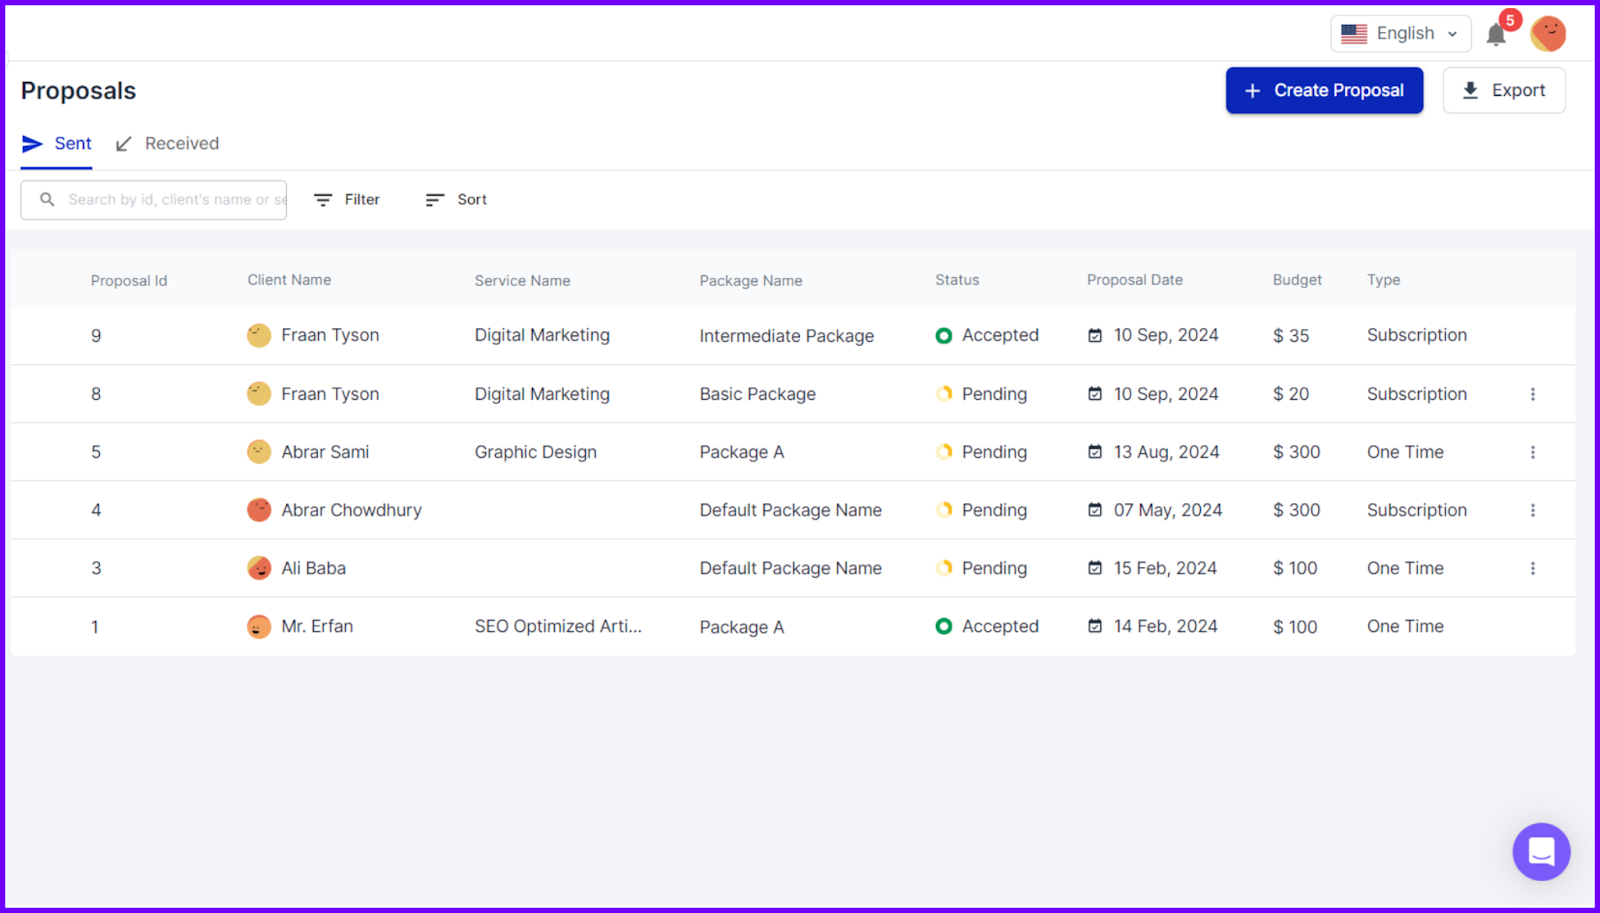
3. Create and Send an Invoice
A professional invoice is very important to uphold your credibility. You can simply send an invoice via PayPal or Stripe and collect payment there.
Another approach is to create an invoice manually with templates from Canva, Apple Numbers, or Microsoft Word.
However, using Agency Handy, a client portal software with advanced billing tools, will save you time and energy. You can manage all the projects, and once completed, you can send the invoices, too.
Select templates, customize them, add your branding, and send. Here’s how to add your branding to invoices in Agency Handy:
- Access Invoice Settings: Go to Invoices from the sidebar and click on the Settings icon at the top right corner.
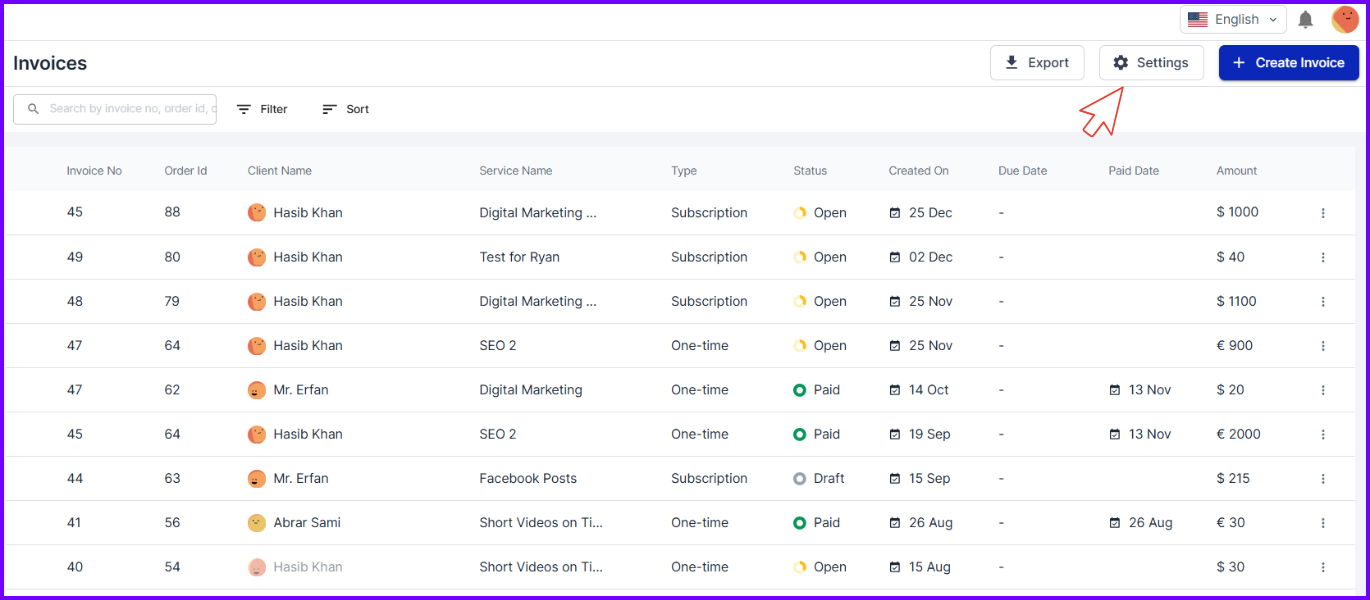
- Customize Invoice: Choose a template and add your logo, title, and default note. Customize colors and select which content to display, such as client address and more.
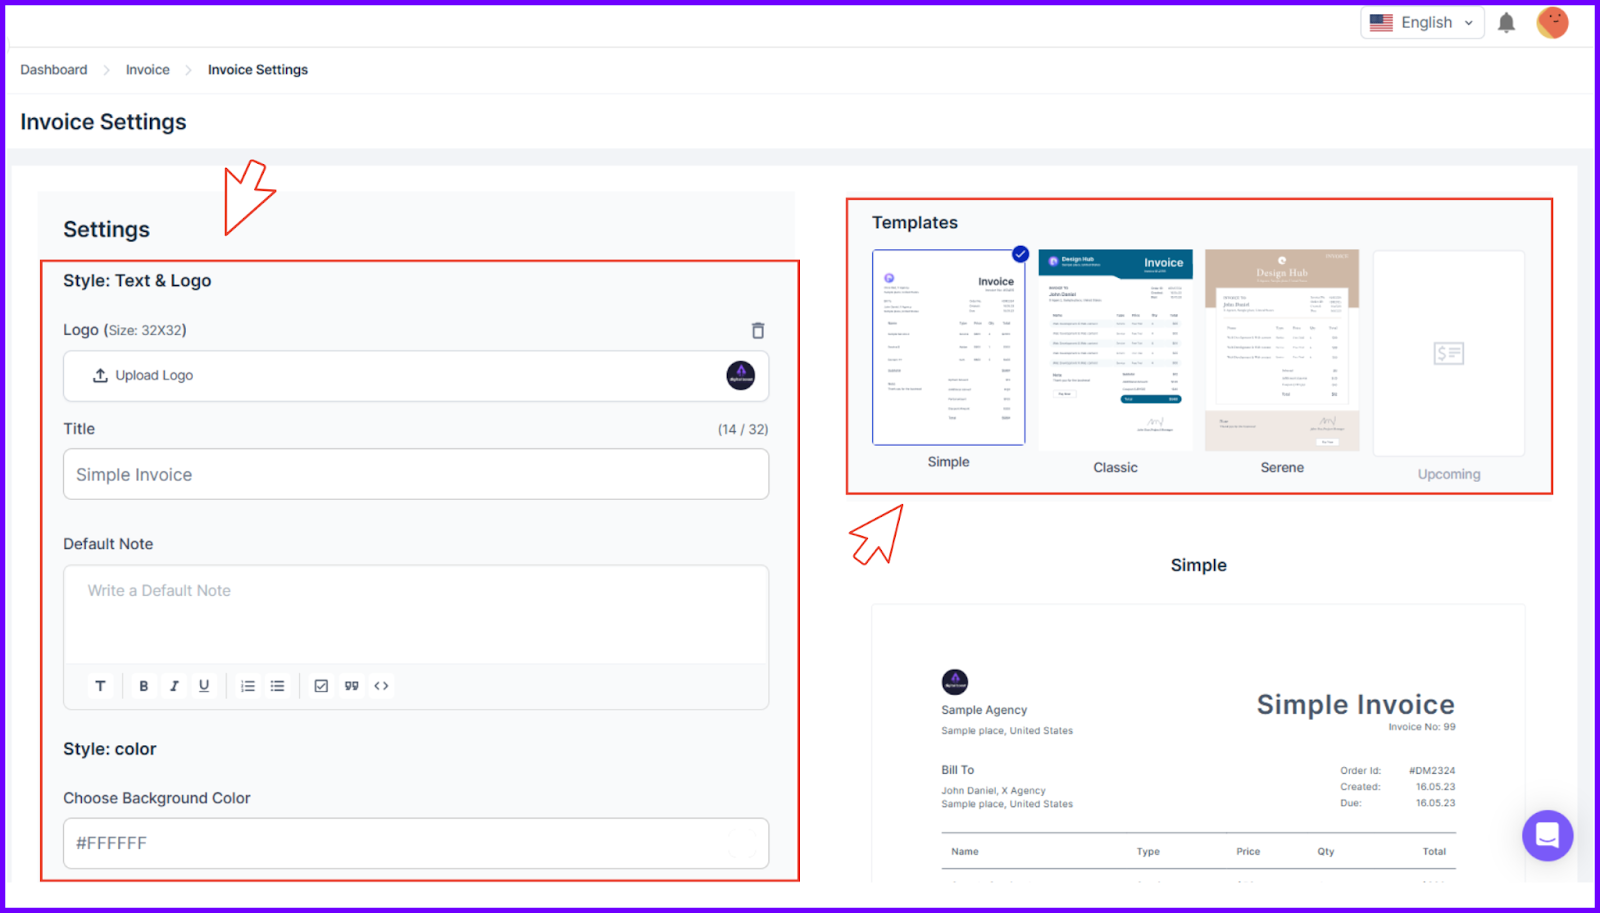
- Save Settings: Add agency signature if you want to and hit the Save button.

You don’t need to repeat this process. Once you set it up, no need to tweak it any longer. The next step is to focus on creating the invoice with accurate details
Now, let’s take a look at how to invoice a client manually on Agency Handy:
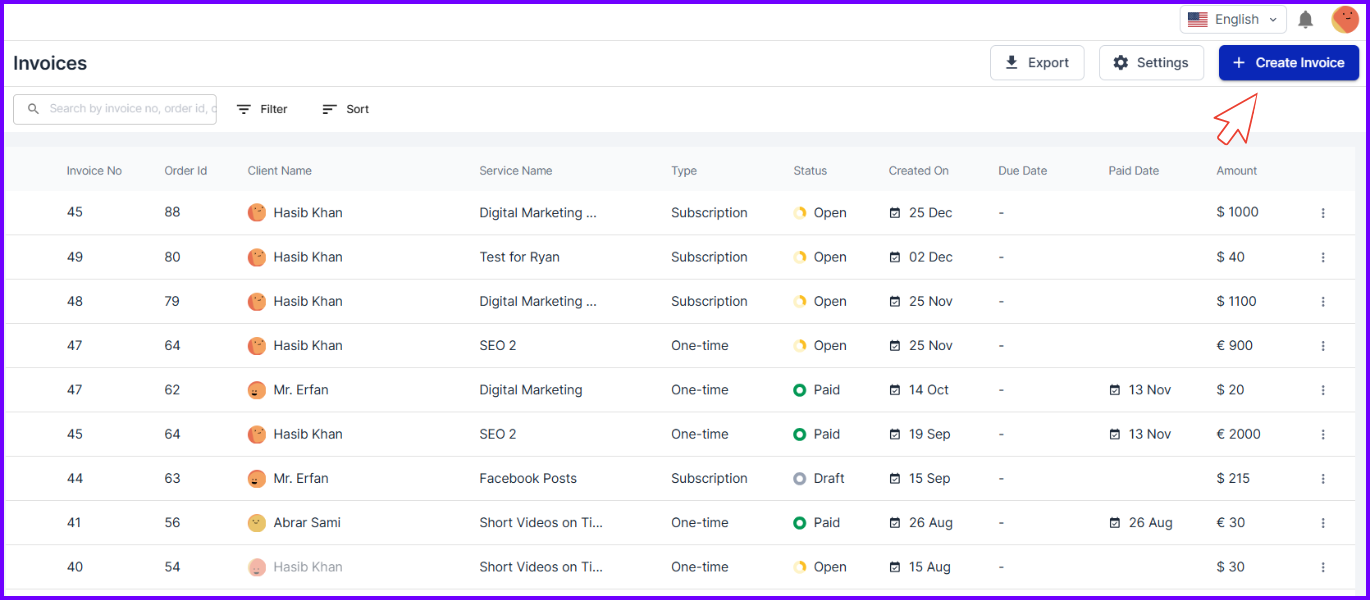
- Create New Invoice: Now click Create Invoice after accessing the Invoices tab.
- Input Client Info: Input client name, order ID, and address, including country, city, state, and zip.
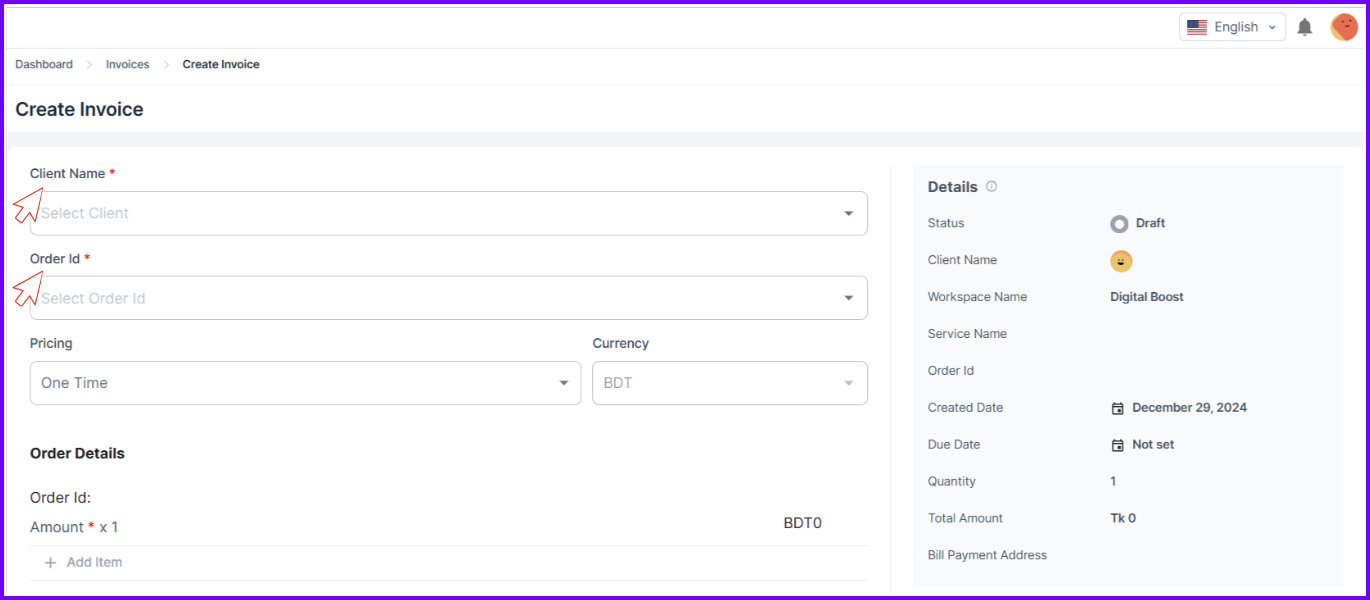
- Select Pricing option: Choose one time or subscription based on your agreements and services provided.
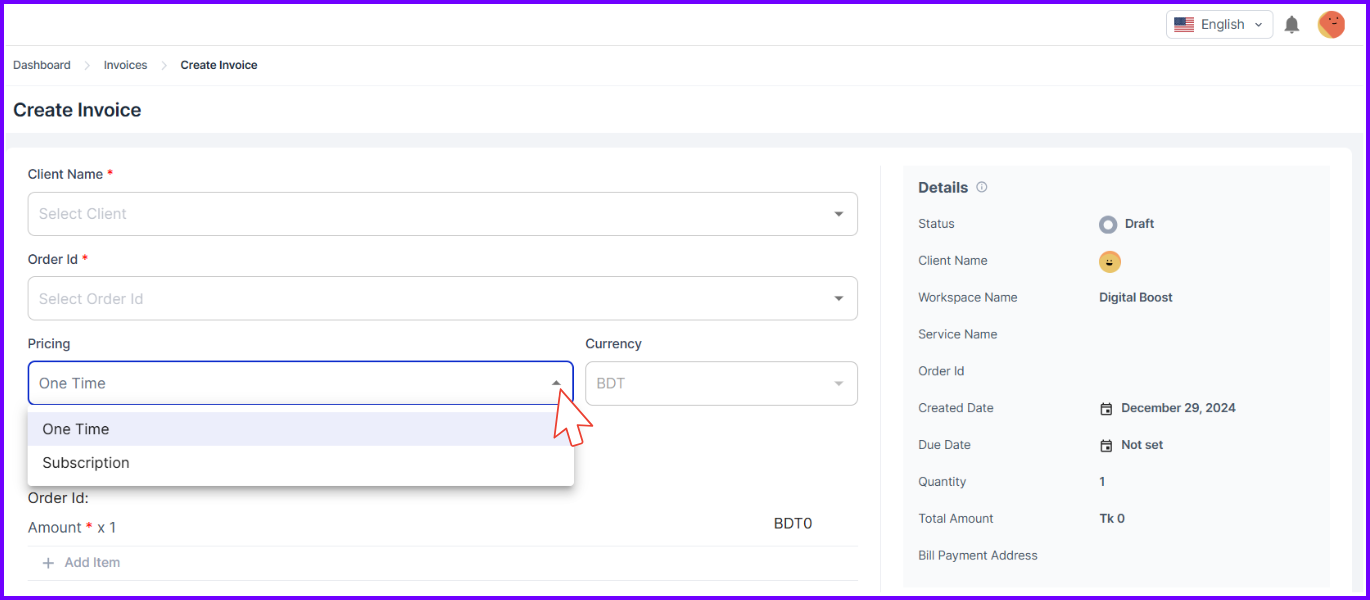
- Set Due Date: You’ll find the due date option on the right side under Details.
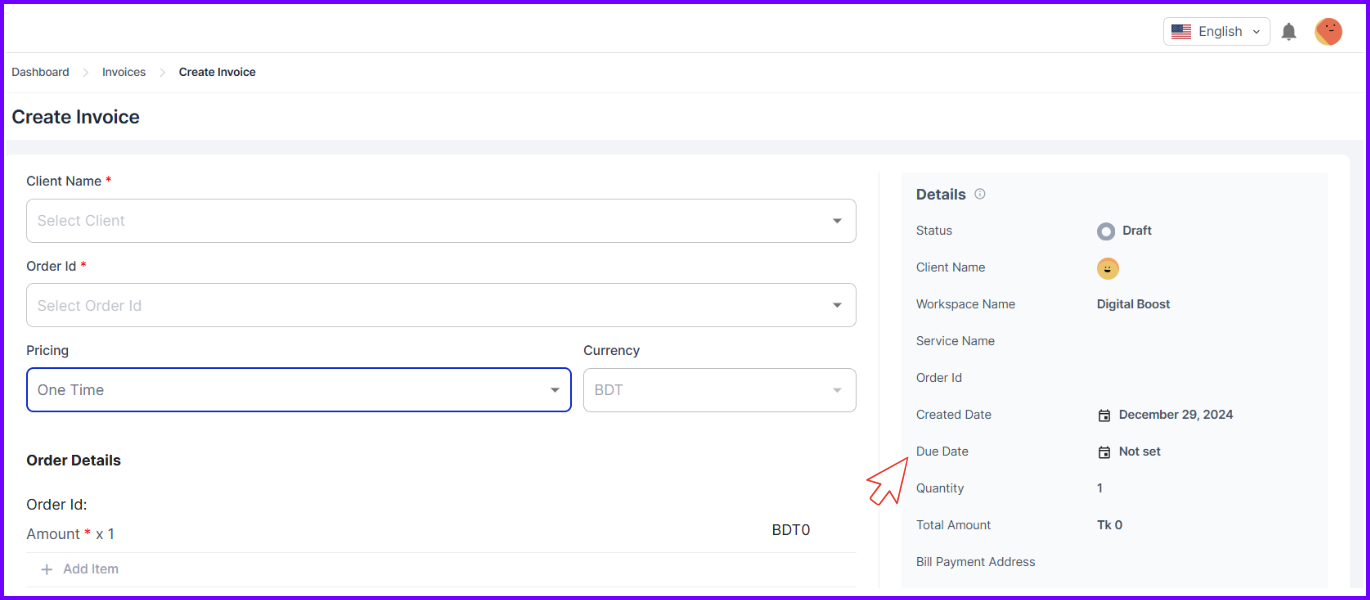
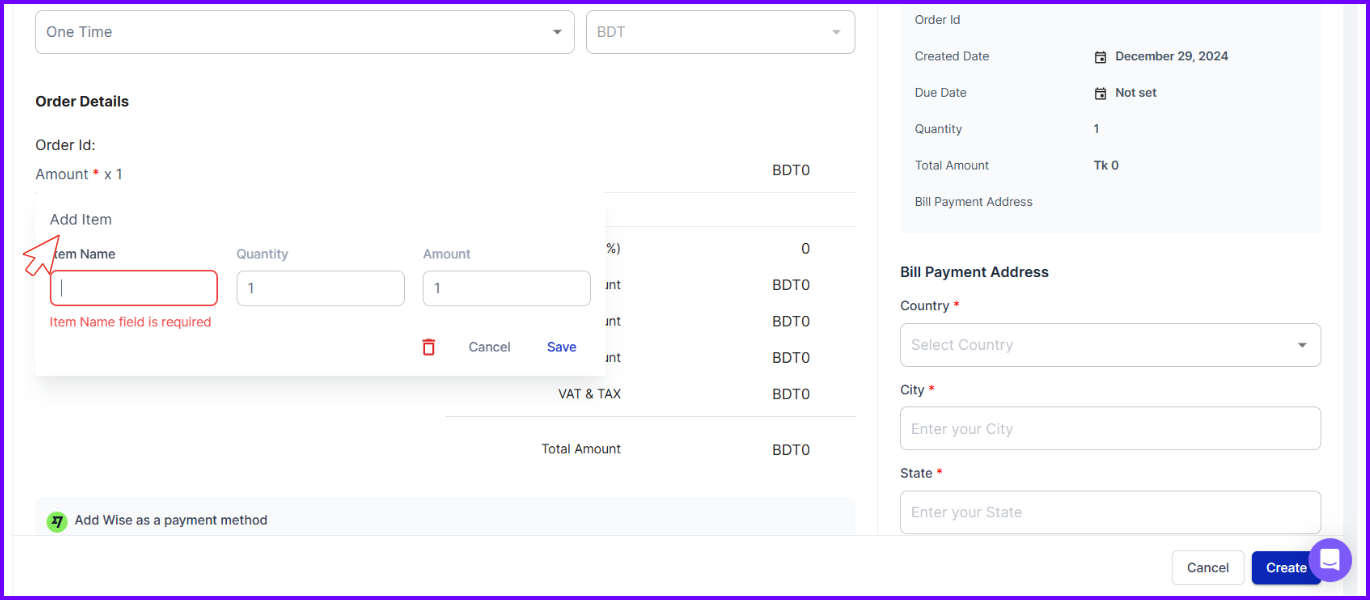
- Itemize Services: Input order details by clicking on Add Item. Fill out the item name, quantity, and amount. Hit save. Do this again to add more items.
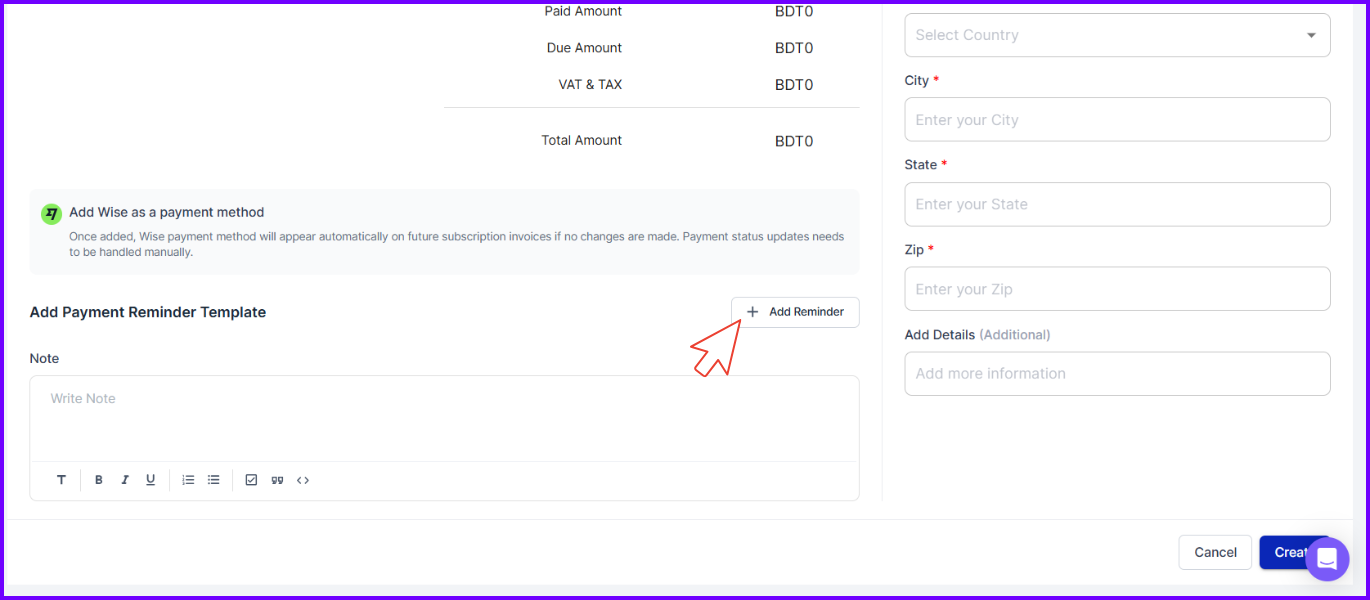
- Additional Information: Set Discount, Paid or Due Amount, VAT & Tax details.
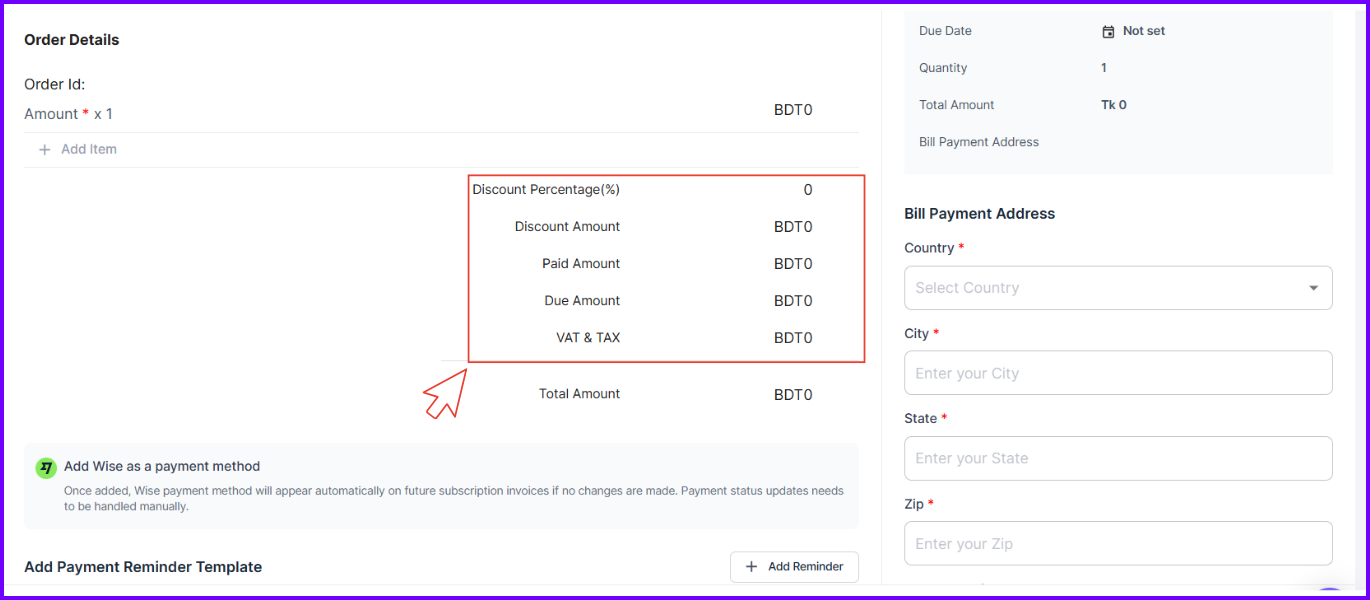
Note: You can add Wise as a payment method, but you have to update the payment status manually. No shortcut or automation there, like other invoices.
- Add Payment Reminder Template: Set the reminder sequence for the invoice. Either you can select the default one or customize it for each invoice.
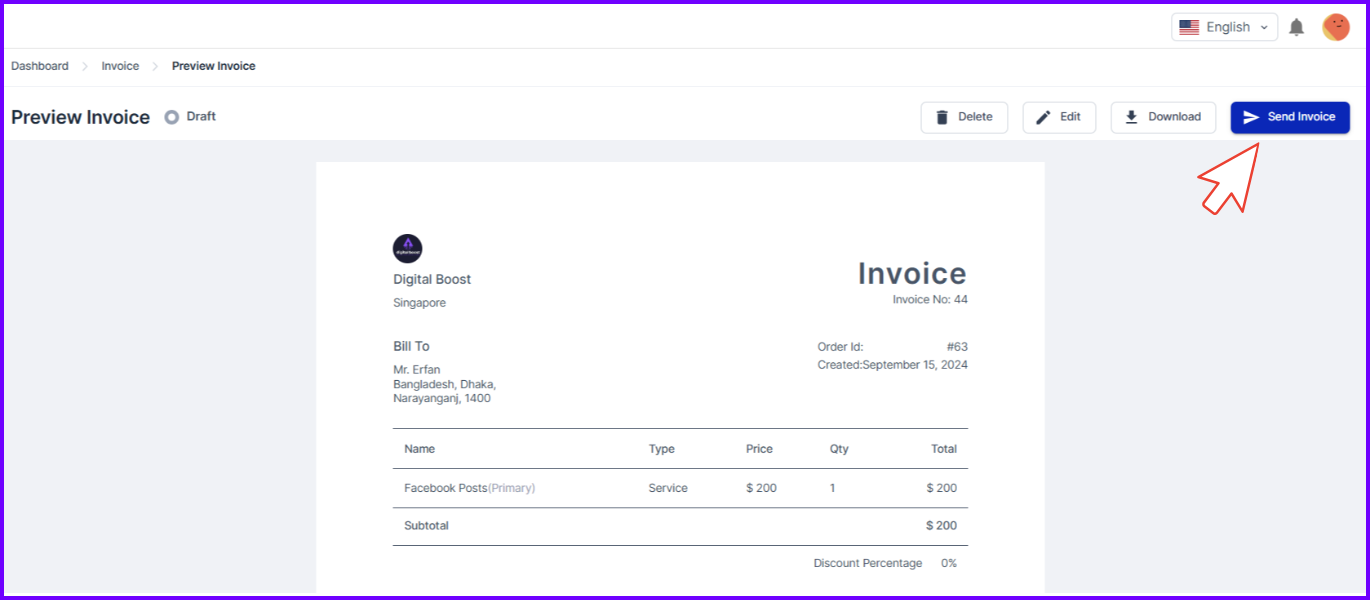
- Save, Review, & Send: Hit Create. The invoice status will be listed as ‘Draft’. Click on it to preview. Select Send. You’ll be notified that it’s sent, and the invoice status will change to ‘Open’.
4. Set Up Automated Reminders (Default)
Each client doesn’t need the same number of reminders. It can even annoy some or, worse, offend them.
With Agency Handy, you can customize the reminders completely as needed. As we’ve already shared how you do that for each invoice, we’ll look at the default customization from Invoice Settings.
Here’s how:
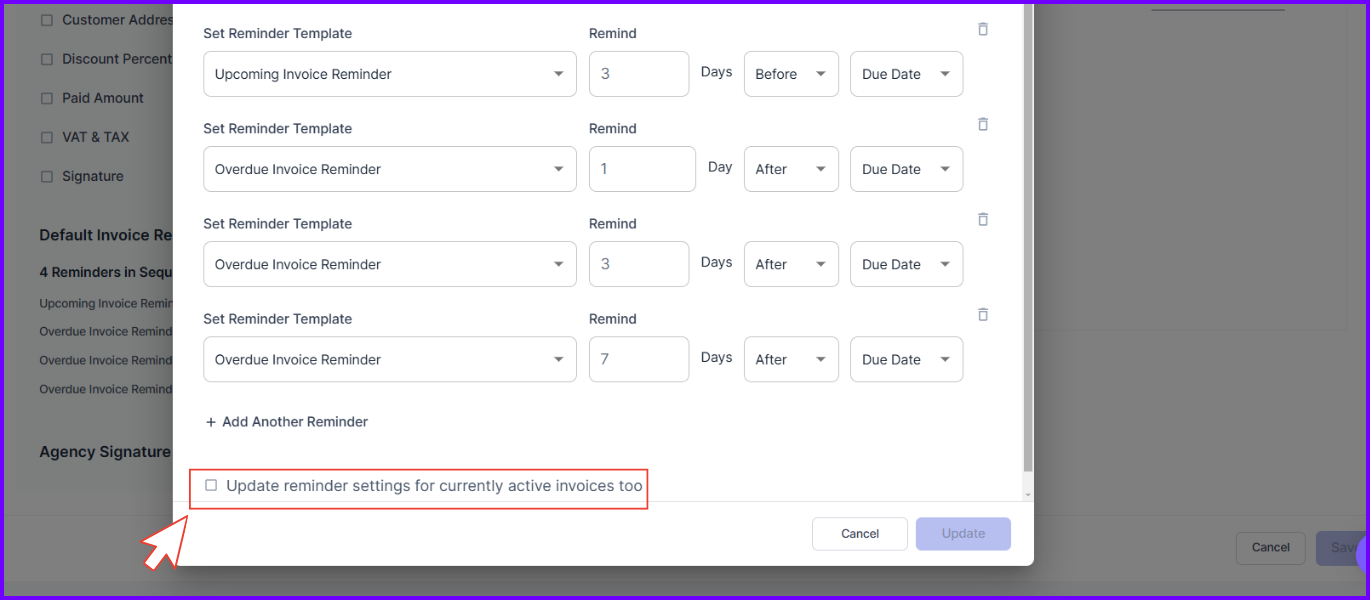
- Access Settings: Open the Invoices tab from the sidebar. Then, go to Settings and scroll to “Default Invoice Reminder.”
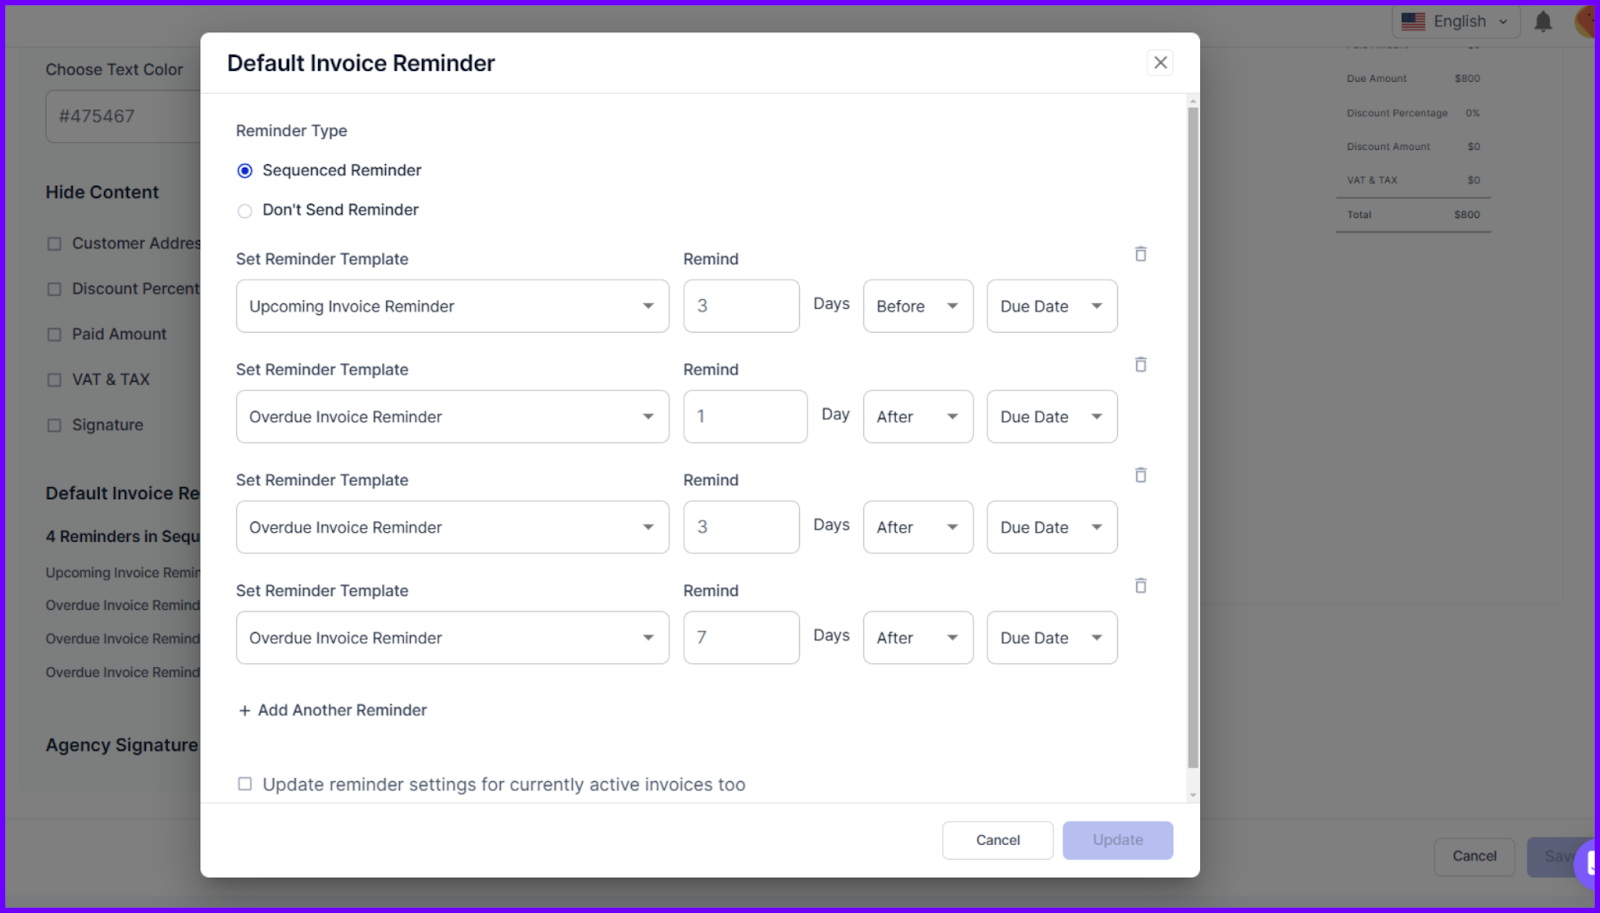
- Select reminder type: “Sequenced Reminder” to set up reminders or “Don’t Send Reminders” if you want to turn reminders off.
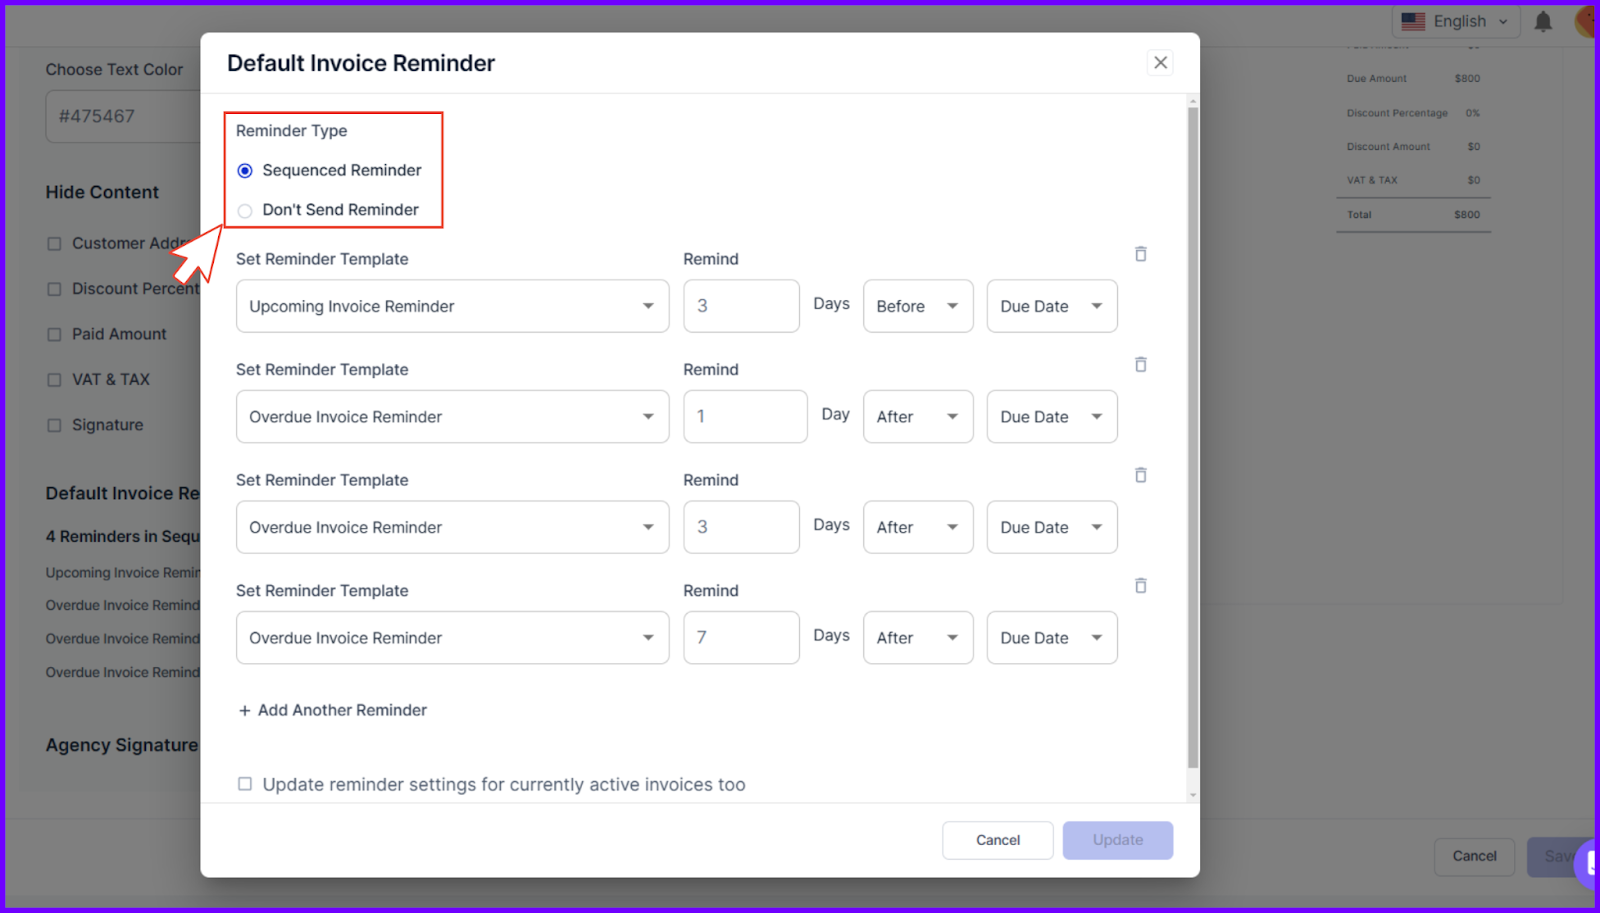
- Input Sequence: Choose a reminder template that fits the situation, set the number of days to send it, and specify whether it should go before or after the due date.
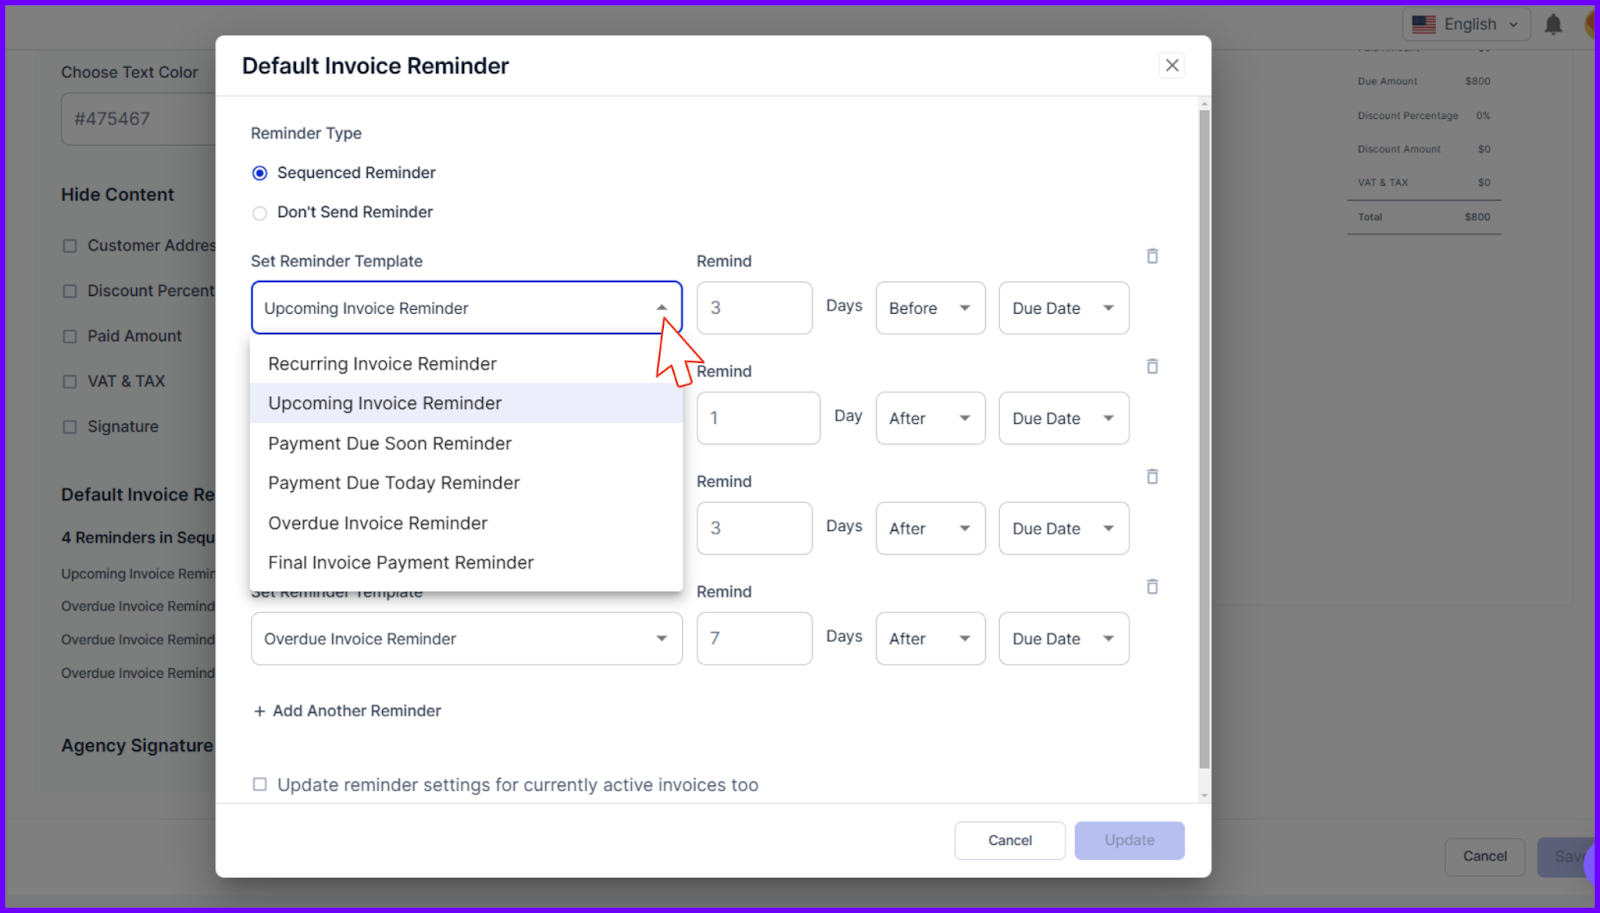
- Save Changes: You can select “Update reminder settings for currently active invoices too,” by clicking on the checkbox before hitting the update button.
Other than that, you can customize the reminder schedule for individual invoices when you are creating an invoice or edit it later if it’s in draft.
Further Read: How to Bill a Client: A Complete Step-by-Step Guide
Best Practices for Billing Clients to Avoid Payment Delays
The biggest challenge when it comes to client billing is ensuring timely payments. By following these best practices, you can create a smoother billing experience while strengthening client trust.
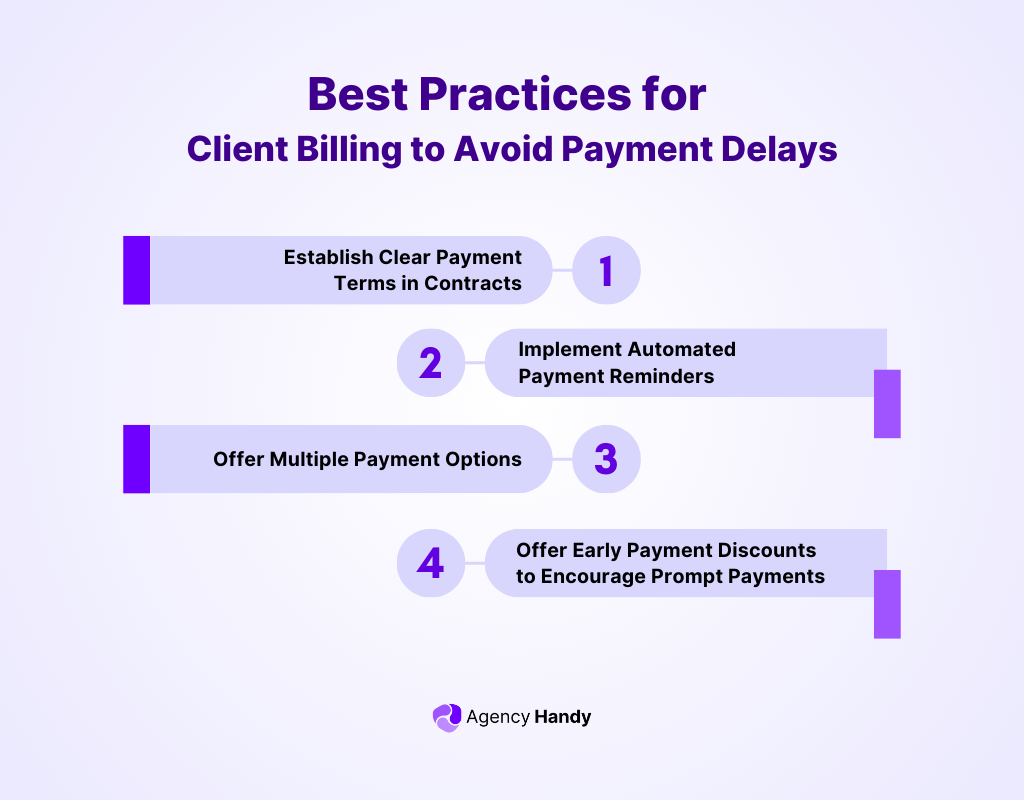
1. Establish Clear Payment Terms in Contracts
Clearly defined payment terms in contracts set mutual expectations and reduce misunderstandings. Lack of clear payment terms can lead to delays, as clients may be unsure about when payments are due or what the payment terms are.
2. Implement Automated Payment Reminders
Automated payment reminders are a simple way in which client billing software helps reduce late payments. They make sure you get paid on time without needing to follow up manually.
In fact, according to Paymentus, proactive reminders can cut late payments by up to 50% from the very first use.
Additionally, you can send reminders through both email and text messages works even better. A report by Chaser indicates that this approach increases your chances of getting paid within a week of the due date by 56%.
It’s an easy way to save time, reduce stress, and keep your payments on track.
3. Offer Multiple Payment Options
Giving your clients different ways to pay makes it easier for them and helps you get paid faster. Options like credit cards, ACH transfers, and digital wallets such as PayPal add convenience and flexibility.
Studies back this up too. A study by MONEI showed that offering multiple payment methods can increase your chances of getting paid by increasing conversion rates.
When people see their preferred way to pay, they’re more likely to follow through.
4. Offer Early Payment Discounts to Encourage Prompt Payments
You can encourage your clients to pay faster with payment discounts. For example, you can offer a 2% discount if they pay within 10 days.
But it’s a double-edged sword, as this strategy eats into your profit margin. However, if your business really needs quick cash, it might be worth the trade-off.
Final Words
Hopefully, now, you’re able to figure out how you will approach client billing for your business. As you now know the dos and don’t of client billing, you’ll likely save a lot of time and get paid faster.
With automation and advanced billing tools on your side, you don’t have to worry about dried-up cash flow. You can create a smooth client billing process that works.
FAQs
What is the client billing format?
A billing format is a structured template used for creating invoices, and outlining provided services, costs, payment terms, and deadlines. It ensures clarity and professionalism, making it easier for clients to understand and process payments efficiently.
How do I talk to my client about billing?
You may be tempted to save this for later, but that’s a bad idea. Always discuss billing upfront. Clearly outline your pricing, payment terms, and methods. Stick to a professional tone and language and address any client concerns. Follow up with written agreements or proposals.
What is minimum billing?
Minimum billing refers to the smallest amount a client is charged, regardless of the actual work completed. It’s commonly used in retainers or agreements to ensure a baseline income for services rendered, even during low-activity periods.
Is there a difference between customer and client billing?
Yes, customer billing involves one-time transactions for products or short-term services, while client billing focuses on ongoing, customized services with detailed invoices, recurring payments, and agreements tailored to long-term professional relationships.


