

Onboarding new clients can feel overwhelming, but it doesn’t have to be. 74% of clients will redirect to competitors if you have a complex onboarding in service or product.
So, client onboarding is more than just a first step in the customer journey. And with the right client onboarding checklist, you can nail every projects. Here’s how it should be:
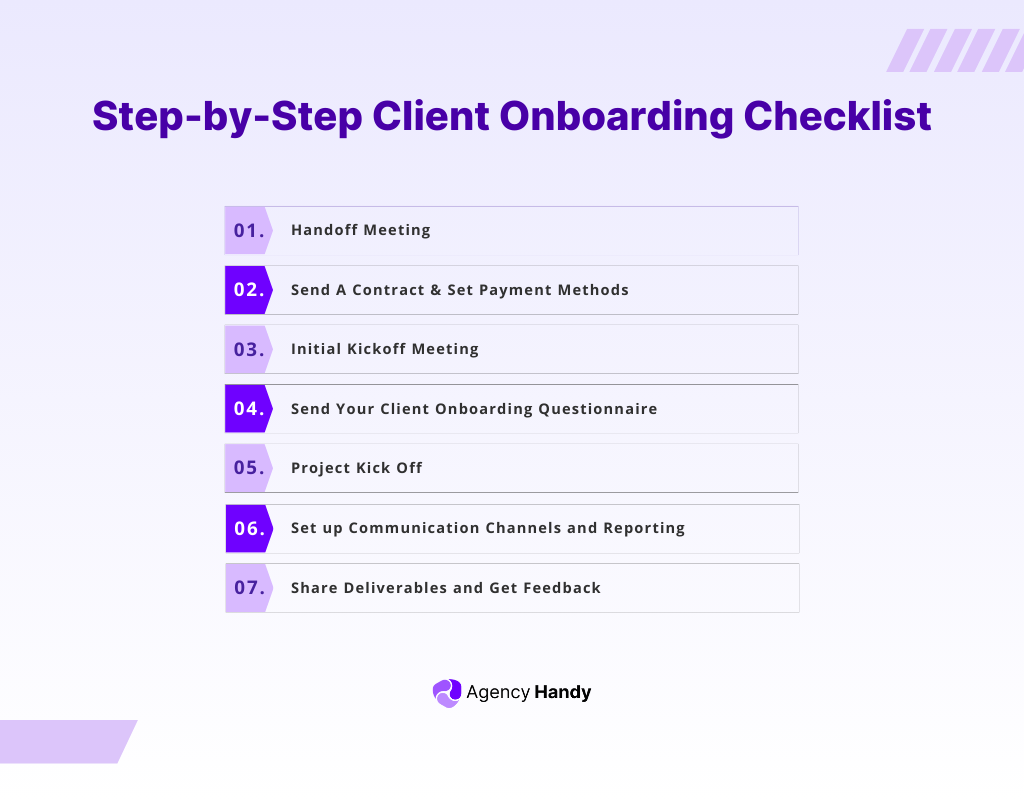
- A quick handoff meeting
- Send a contract and set up payment methods
- Initial kickoff meeting
- Send onboarding questionnaire
- Project kickoff and execution
- Set up communication channels and reporting
- Share deliverables and get feedback
In this article, we’ll walk you through the complete client onboarding checklist. These steps will help you create an organized and professional process, ensuring every new client starts off on the right foot. Let’s get started!
What is a Client Onboarding Checklist?
A client onboarding checklist is a straightforward, step-by-step guide that ensures you don’t miss a single detail when welcoming a new client. It outlines every action you need to take to seamlessly integrate the client into your workflow and start the relationship on the right note.
So, why is a client onboarding checklist so important?
- It gives you a clear and organized process for welcoming new clients, reducing confusion for everyone involved.
- It ensures no important step gets overlooked, keeping things efficient and professional.
- It sets clear expectations early, helping to improve communication and build trust with your client.
- A smooth onboarding experience leads to happier clients, which increases satisfaction and retention.
- It saves you time by streamlining tasks and ensuring everything is done right the first time.
- Most importantly, it helps lay the foundation for strong and lasting client relationships.
Client Onboarding Checklist: Create Yours within 7 Steps
Here is a detailed guide that outlines each step of the client onboarding process to ensure a smooth and successful partnership.
Step 1: Handoff Meeting
A handoff meeting ensures a seamless transition from the sales team to the project team. It sets the tone for the entire collaboration and establishes a clear understanding of goals and expectations.
Key Actions:
- Introduce the project team and define each member’s role.
- Review the project scope, timeline, and key milestones.
- Share all relevant documentation, including contracts, goals, and deliverables.
- Clarify the client’s expectations and success metrics.
- Address any initial questions or concerns from the client.
This meeting is the foundation of a strong working relationship. It allows the project team to fully understand the client’s needs while reassuring the client that they’re in capable hands.
By reviewing key milestones and deliverables, you establish a shared vision for success. Addressing any concerns upfront minimizes potential roadblocks and ensures the team can move forward confidently.
A structured handoff meeting demonstrates professionalism, creates alignment, and builds trust, setting the stage for a successful project.
Further Read: Top 8 Client Onboarding Templates You Must Have in 2025
Step 2: Send A Contract & Set Payment Methods
Once the handoff meeting is complete, it’s time to formalize the agreement with a contract and establish payment arrangements. This step ensures transparency and sets the foundation for a smooth financial workflow.
A well-drafted contract is more than just a formality, it’s your client’s first reassurance that you’re committed to delivering as promised. Ensure the document is comprehensive but easy to understand, detailing all expectations and eliminating room for confusion.
The W-9 form in this step ensures your business complies with tax requirements and avoids delays during payment processing. Request the form early to streamline your financial workflow.
Use a client onboarding software with proposal management features to streamline this step.
These tools allow you to share the contract, track its status, and enable clients to review and sign documents seamlessly. It also keeps everything centralized for both parties, making future reference easy.
When setting up payment methods, discuss options with the client to ensure convenience and reliability. Clearly outline the payment schedule, whether it’s a one-time fee, milestone-based, or recurring.
Taking the time to organize this step properly not only protects your business but also reassures the client that they’re in good hands.
To Summarize:
- Draft a clear contract that outlines the project scope, deliverables, timelines, and payment terms.
- Use a digital signature tool to send the contract for faster approvals.
- Request the client’s W-9 form for tax and compliance purposes.
- Confirm the client’s preferred payment methods (e.g., bank transfers, credit cards, or online gateways).
- Set up recurring payments or milestone-based invoicing, if applicable.
- Verify that the contract is signed and payment details are finalized.
Step 3: Initial Kickoff Meeting
The initial kickoff meeting transitions from planning to execution. This session is about finalizing the operational details and ensuring everyone is prepared to move forward confidently.
| Action Plan |
| Confirm that both sides understand all project details from the handoff meeting |
| Share the finalized project timeline, key milestones, and deliverables |
| Address any updates or changes since the handoff meeting |
| Discuss immediate tasks and responsibilities for the client and your team |
| Set expectations for communication, reporting, and feedback |
| Identify any specific tools, access, or resources the client needs to provide |
| Establish a clear plan for the first project phase and the next steps |
Before diving into the work, take a moment to ensure everyone is aligned on the project’s goals and direction. Review any recent changes to deadlines or deliverables and clear up potential misunderstandings early to avoid hiccups down the line.
Focus on immediate priorities by identifying the first set of tasks that need attention. Assign roles and responsibilities, ensuring everyone knows their part. Confirm access to tools, files, or other resources required to get started, and agree on realistic deadlines to keep things moving.
A clear communication plan is essential for smooth collaboration. Decide how updates will be shared, whether through regular emails, a shared dashboard, or scheduled check-ins. Establish a rhythm that works for everyone.
To close out this step, break down the first phase of the project into manageable steps. Providing a clear roadmap not only keeps the team focused but also builds confidence that the project is off to a strong and organized start.
Step 4: Send Your Client Onboarding Questionnaire
An onboarding questionnaire is your chance to dig deep into what your client truly wants and needs. It’s the tool that helps you customize your approach to deliver on client expectations.
What To Do:
- Design a questionnaire that captures the client’s goals, priorities, and pain points.
- Include questions about branding, target audience, and specific project requirements.
- Share the questionnaire (use an online form or client portal).
- Communicate the purpose of the questionnaire and how their input will shape the project.
- Review the responses thoroughly and address any gaps or clarifications.
Creating a great onboarding experience starts with a questionnaire that’s clear, easy to understand, and customized to your client’s needs.
Focus on gathering the most important details, like project goals, brand identity, and any resources they can provide. Avoid overwhelming clients with too many questions, keep it focused and to the point.
Sharing this questionnaire through an intuitive format, like a client portal, ensures it’s convenient for clients to complete and keeps the process seamless.
With custom intake forms, Agency Handy takes the hassle out of this step. These forms are automatically generated when a client purchases a service, capturing all the necessary details right from the start.
Once you’ve received the client’s responses, take the time to review them thoroughly. Follow up to clarify any uncertainties and ensure you have all the information you need to move forward confidently.
Step 5: Project Kick Off
The project kick-off marks the official start of execution. It’s the point where planning becomes action, and tasks begin to take shape.
Key Actions for Project Kick-Off:
- Break down the first phase into clear, actionable tasks with specific deadlines.
- Use a task management platform to centralize communication and track progress.
- Automate recurring updates, reminders, or task assignments.
- Ensure all resources, files, and tools required for execution are organized and accessible.
Start by defining the immediate priorities and dividing them into manageable tasks. Assign responsibilities and set clear deadlines, ensuring everyone knows what’s expected of them and when.
You can use tools like Agency Handy’s task management features to keep everything in one place. A centralized platform allows the team and client to view progress, share updates, and communicate seamlessly.
Moreover, you can automate repetitive processes to improve efficiency. Whether it’s task creation or sending reminders for upcoming deadlines, automation will save your team time.
Finally, double-check that all tools, resources, and files needed for execution are ready and accessible to the team. Keeping things organized at the start prevents delays and keeps the focus on delivering results.
Step 6: Set up Communication Channels and Reporting
Strong communication and clear reporting keep your project organized and ensure everyone is aligned. This step focuses on creating systems that simplify updates and collaboration.
Start by selecting the most effective channels for the project. Whether it’s a shared workspace for ongoing updates or a chat for quick questions, make sure all participants know how to connect.
A well-defined reporting structure helps track progress and keeps stakeholders informed. Use concise, focused reports to summarize key milestones, tasks, and deliverables.
Establish regular check-ins to stay aligned. Weekly or bi-weekly meetings allow the team and client to address concerns early and maintain momentum.
Clear communication protocols also ensure that urgent matters are handled efficiently, reducing delays and misunderstandings. With these systems in place, the entire team can stay focused and on track.
To Summarize:
- Choose communication channels like email, chat, or a project management tool for regular updates.
- Set up a structured reporting system to track milestones, progress, and deliverables.
- Schedule regular check-ins or status meetings to discuss updates and resolve concerns.
- Define expectations for response times and urgent communication protocols.
- Ensure all team members and the client are clear on how and where to share updates.
Step 7: Share Deliverables and Get Feedback
Delivering high-quality work isn’t possible without allowing for client feedback. It ensures you’re aligned with client expectations and can make necessary adjustments for success.
Action Plan:
- Share deliverables in a format that’s easy for the client to review and access.
- Establish a timeline for receiving and incorporating client feedback.
- Address feedback constructively and confirm any required revisions.
- Finalize deliverables based on approved feedback and document the process.
When presenting deliverables, ensure they are well-organized and accessible, whether through a client portal, shared drive, or email. Use collaborative tools, such as comment features or shared documents, to make the feedback process seamless.
Set a reasonable timeline for collecting and implementing feedback. This ensures revisions are completed promptly without delaying the overall project.
Here’s some advice you need to hear when it comes to receiving feedback – always approach it constructively. It’s an important box to tick, especially on the marketing client onboarding checklist as performance measures are straightforward in this case.
By maintaining open communication and involving the client in the process, you not only ensure satisfaction but also strengthen your working relationship for future projects.
How Can a Client Onboarding Checklist Help Your Business?
A well-structured client onboarding checklist can significantly benefit your business. Here’s how:
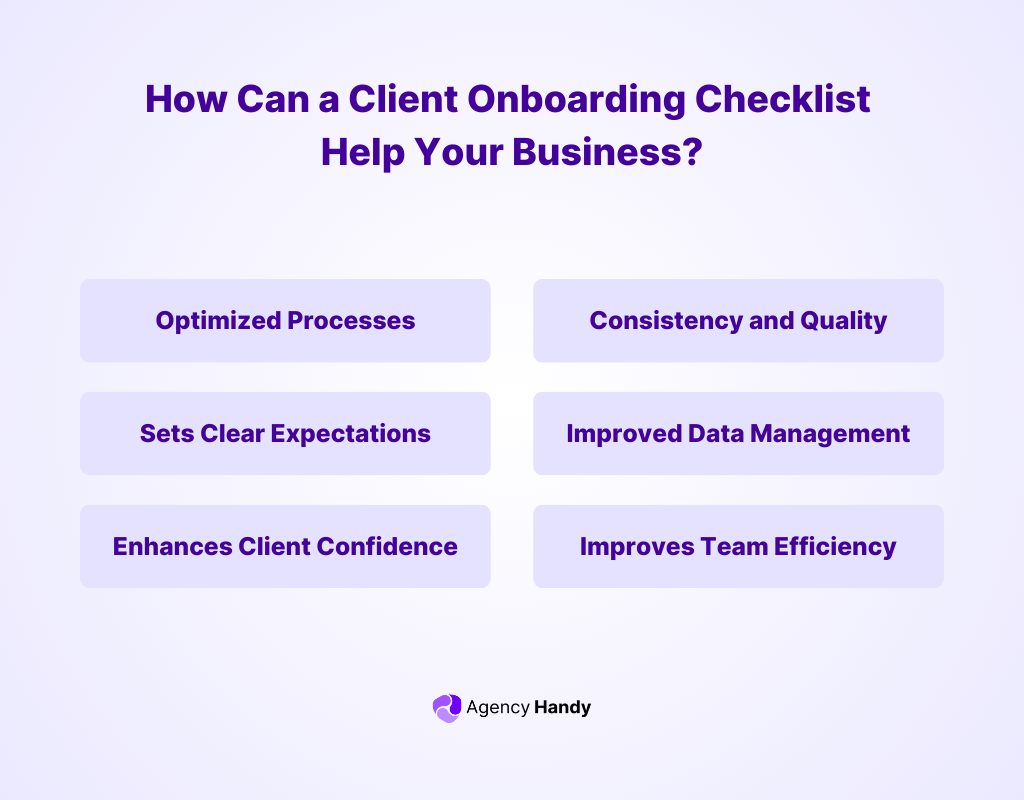
1. Optimized Processes
A customer onboarding checklist ensures that all necessary steps are followed in a logical order. This reduces the risk of missed steps or duplicated efforts. It leads to more efficient operations and quicker onboarding times.
2. Sets Clear Expectations
By outlining goals, deliverables, and timelines early on, a checklist helps you and your clients align on what’s expected. This clarity minimizes misunderstandings and creates a strong foundation for collaboration.
3. Gain Client Confidence
A professional client onboarding process demonstrates that you’re reliable and detail-oriented. When clients see a well-thought-out system in place. It builds their trust and confidence in your ability to deliver.
4. Consistency and Quality
Using a checklist ensures that every client receives the same high standard of service. This consistency improves client satisfaction and maintains the quality of work across different projects and clients.
5. Improved Data Management
A customer onboarding checklist helps in systematically collecting and validating client data. This organized approach to data management reduces errors and ensures that you have all the necessary information to start the project on the right foot.
6. Improves Team Efficiency
A standardized checklist helps your team stay organized and focused. It eliminates guesswork, ensuring that every team member knows their role in the onboarding process, which leads to smoother project execution.
Common Challenges in Client Onboarding
Client onboarding comes with its share of challenges that can affect both the process and the client experience. Recognizing these hurdles is the first step to resolving them and creating a smooth onboarding journey.
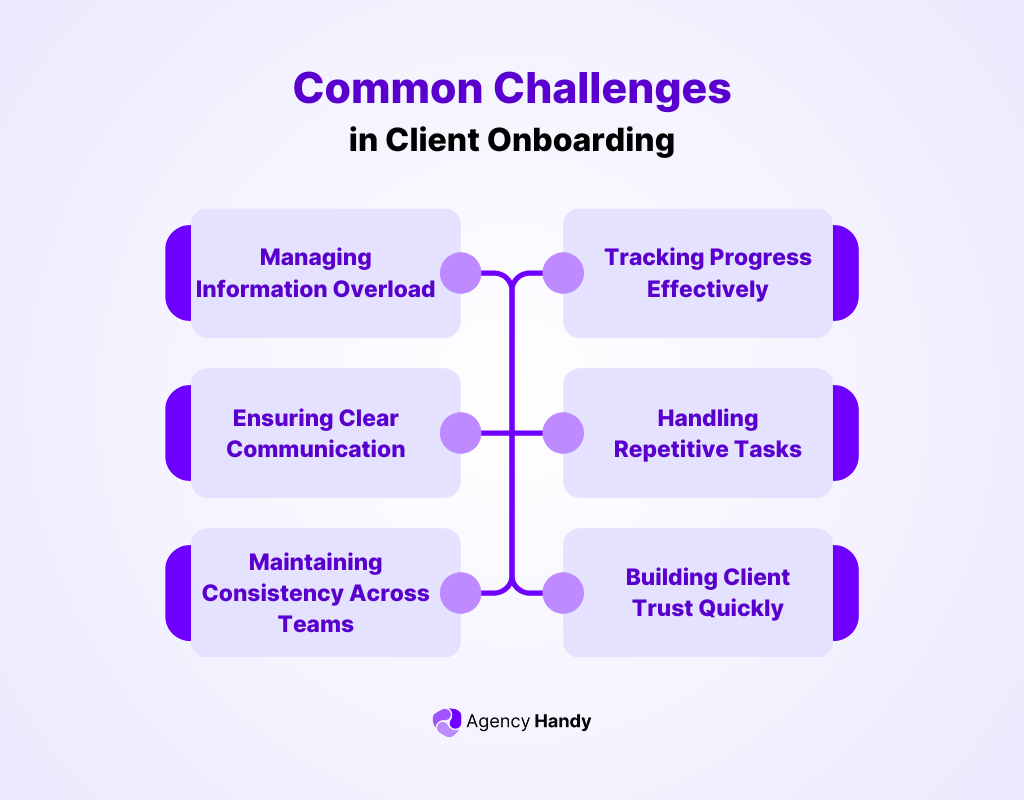
- Managing Information Overload: Gathering and organizing a lot of client information can quickly feel overwhelming if you don’t have a clear system in place. Without structure, important details can get lost, causing confusion and delays.
- Ensuring Clear Communication: Miscommunication or a lack of timely updates can create misunderstandings. This often leads to delays and frustration for both you and your client, making it harder to keep things on track.
- Maintaining Consistency Across Teams: When multiple team members are involved, keeping everyone on the same page can be tough. Inconsistencies in the process can lead to missed steps or gaps that affect the overall experience.
- Tracking Progress Effectively: Without a reliable way to monitor tasks and deadlines, it’s easy to lose track of what has been done and what’s still pending. This can result in unnecessary delays and incomplete onboarding.
- Handling Repetitive Tasks: Sending the same documents, emails, or updates repeatedly can drain your time and energy. These repetitive tasks can slow you down and distract you from more important work.
- Building Client Trust Quickly: A poorly organized or unclear onboarding process can leave a bad impression. When clients sense confusion, they may doubt your professionalism and reliability from the start.
Best Practices for Creating Client Onboarding Checklist
Implementing best practices for client onboarding is key to setting a strong foundation for client relationships. Here are some concise tips to ensure a smooth and effective client onboarding process.
- Personalize the Experience: Modify the onboarding process to fit each client’s needs, goals, and preferences to show commitment and build trust.
- Communicate Clearly: Maintain transparent and consistent communication to keep clients informed and aligned at every step.
- Set Realistic Expectations: Outline clear goals, timelines, and deliverables to avoid misunderstandings and ensure mutual alignment.
- Provide Accessible Resources: Offer easy-to-use guides, templates, or FAQs to help clients navigate the process confidently.
- Create a Structured Plan: Break onboarding into clear, actionable steps to ensure organization and efficiency.
- Gather Feedback: Regularly ask for client input to identify improvements and refine your process.
- Assign a Point of Contact: Designate a single contact person to guide clients and address their questions or concerns.
- Focus on Relationships: Build rapport by understanding clients’ goals and showing genuine interest in their success.
Final Thoughts
An effective onboarding process sets the stage for a successful client relationship. When you approach onboarding with care and a clear plan, clients feel supported, valued, and excited to work with you.
A well-organized checklist keeps the process smooth, ensures everyone stays on the same page and builds confidence in your services.
By prioritizing communication, personalization, and efficiency, you can create a standout experience that builds trust and loyalty. Begin today, and see the difference a great onboarding process makes!


